Troubleshooting
404 or 503 error responses from API requests
When making prediction requests to your API, it's possible to get a {"message":"Not Found"} error message (with HTTP status code 404), or a no healthy upstream error message (with HTTP status code 503). This means that there are currently no live replicas running for your API. This could happen for a few reasons:
It's possible that your API is simply not ready yet. You can check the status of your API with
cortex get API_NAME, and stream the logs withcortex logs API_NAME.Your API may have errored during initialization or while responding to a previous request.
cortex get API_NAMEwill show the status of your API, and you can view the logs withcortex logs API_NAME.
It is also possible to receive a {"message":"Service Unavailable"} error message (with HTTP status code 503) if you are using API Gateway in front of your API endpoints and if your request exceeds API Gateway's 29 second timeout. If the request is exceeding the API Gateway timeout, your client should receive the {"message":"Service Unavailable"} response ~29 seconds after making the request. To confirm that this is the issue, you can modify your predict() function to immediately return a response (e.g. return "ok"), re-deploy your API, wait for the update to complete, and try making a request. If your client successfully receives the "ok" response, it is likely that the API Gateway timeout is occurring. You can either modify your predict() implementation to take less time, run on faster hardware (e.g. GPUs), or don't use API Gateway (there is no timeout when using the API's endpoint).
API is stuck updating
If your API is stuck in the "updating" or "compute unavailable" state (which is displayed when running cortex get), there are a few possible causes. Here are some things to check:
Check cortex logs API_NAME
cortex logs API_NAMEIf no logs appear (e.g. it just says "fetching logs..."), continue down this list.
Check max_instances for your cluster
max_instances for your clusterWhen you created your Cortex cluster, you configured max_instances (either from the command prompts or via a cluster configuration file, e.g. cluster.yaml). If your cluster already has min_instances running instances, additional instances cannot be created and APIs may not be able to deploy, scale, or update.
You can check the current value of max_instances by running cortex cluster info (or cortex cluster info --config cluster.yaml if you have a cluster configuration file).
You can update max_instances by running cortex cluster configure (or by modifying max_instances in your cluster configuration file and running cortex cluster configure --config cluster.yaml).
Check your AWS auto scaling group activity history
In most cases when AWS is unable to provision additional instances, the reason will be logged in the auto scaling group's activity history.
Here is how you can check these logs:
Log in to the AWS console and go to the EC2 service page
Click "Auto Scaling Groups" on the bottom of the side panel on the left
Select one of the "worker" autoscaling groups for your cluster (there may be two)
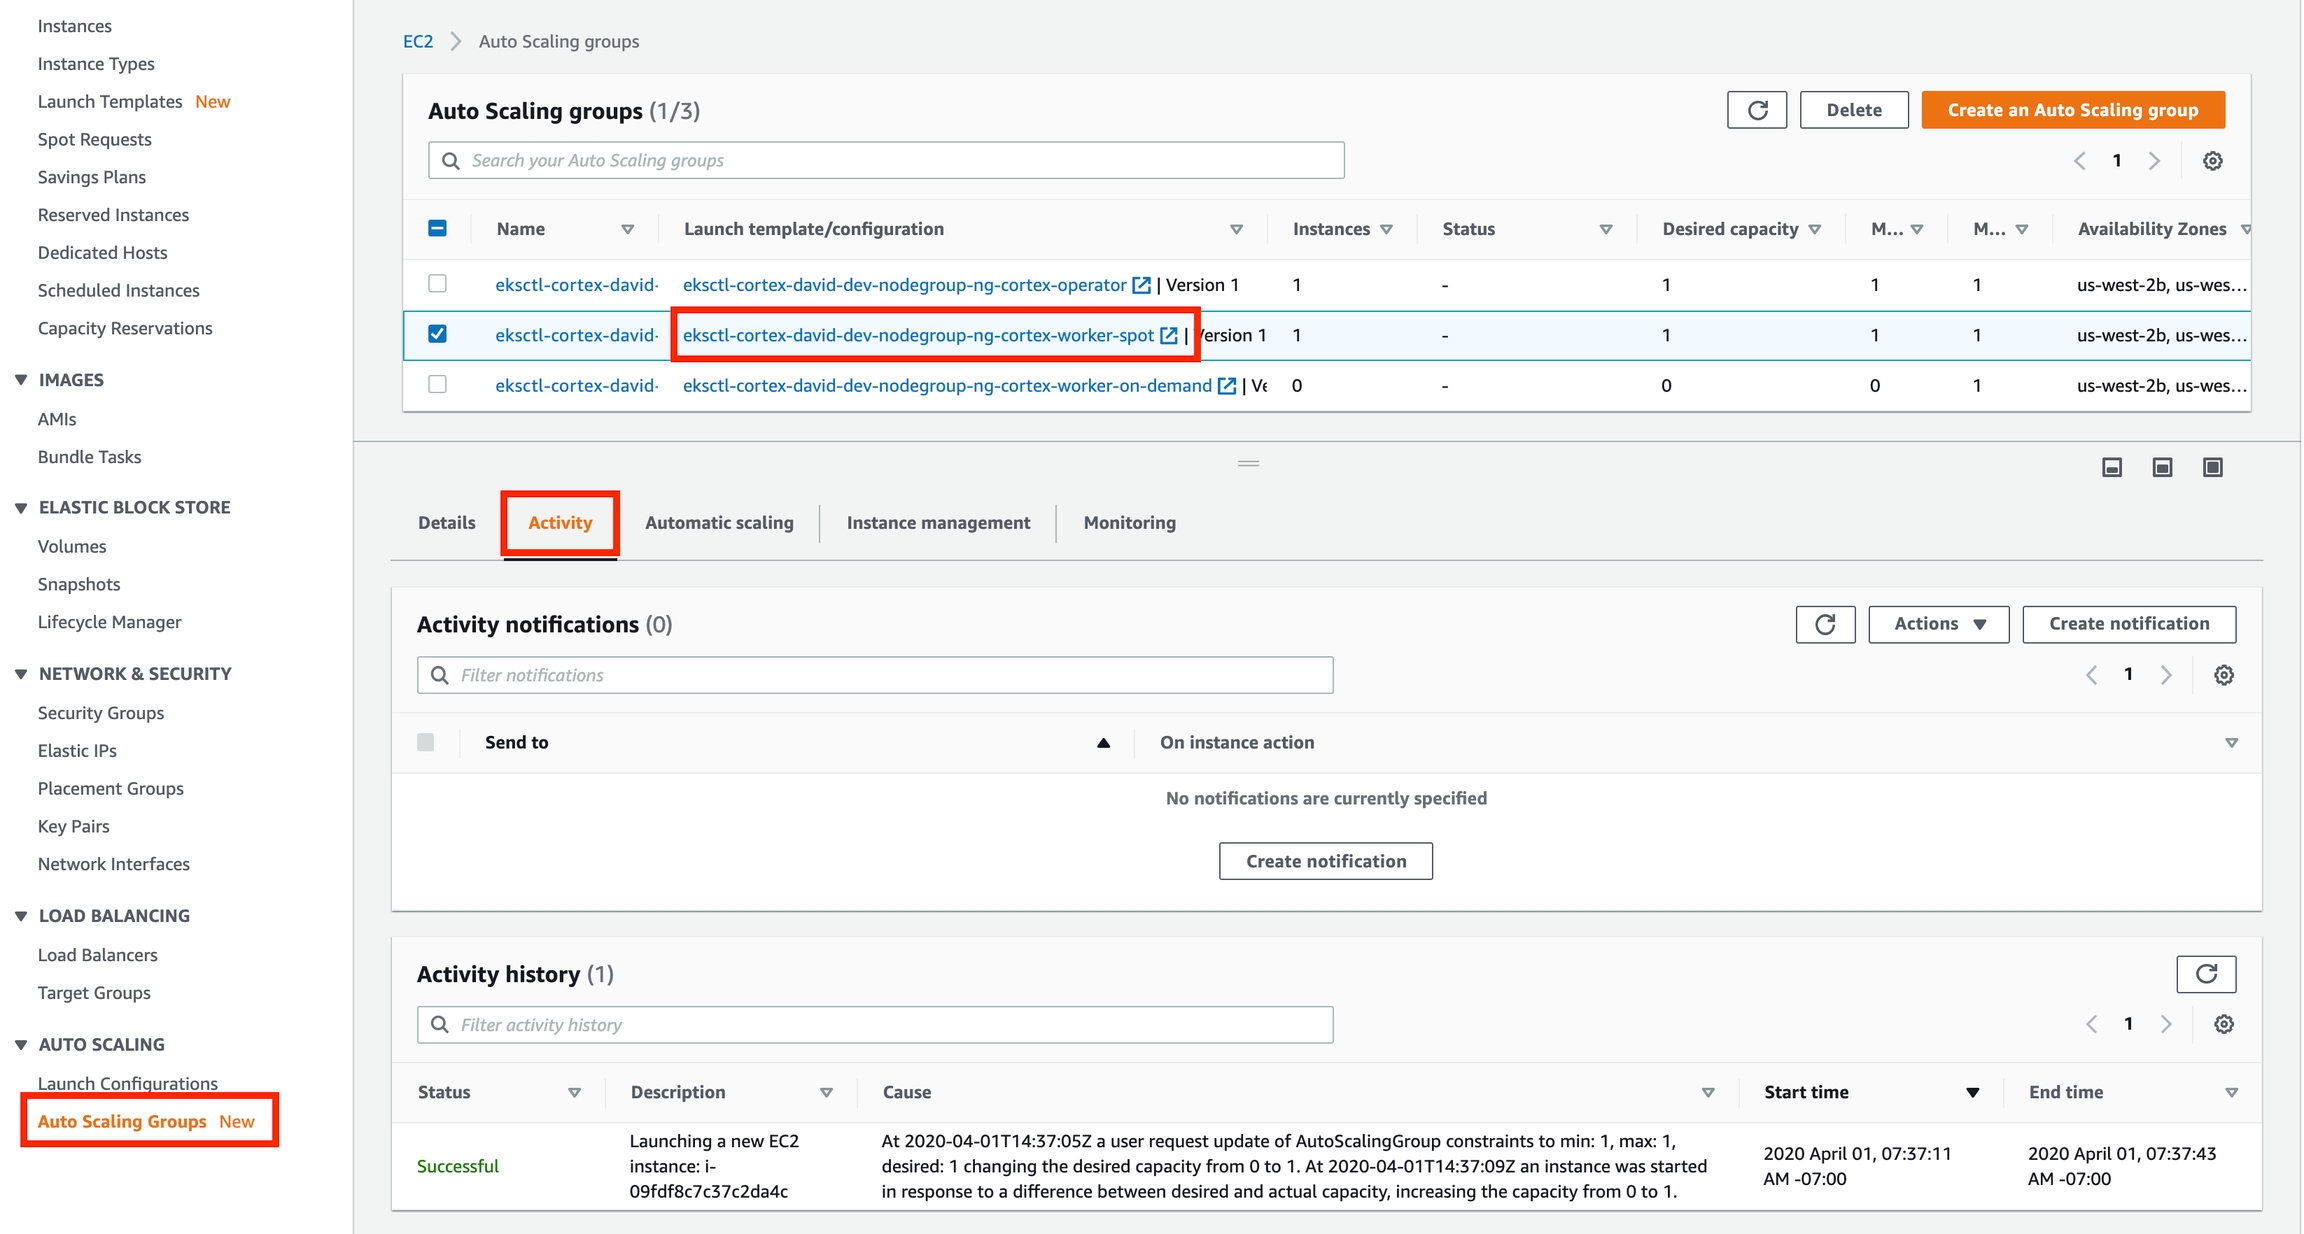
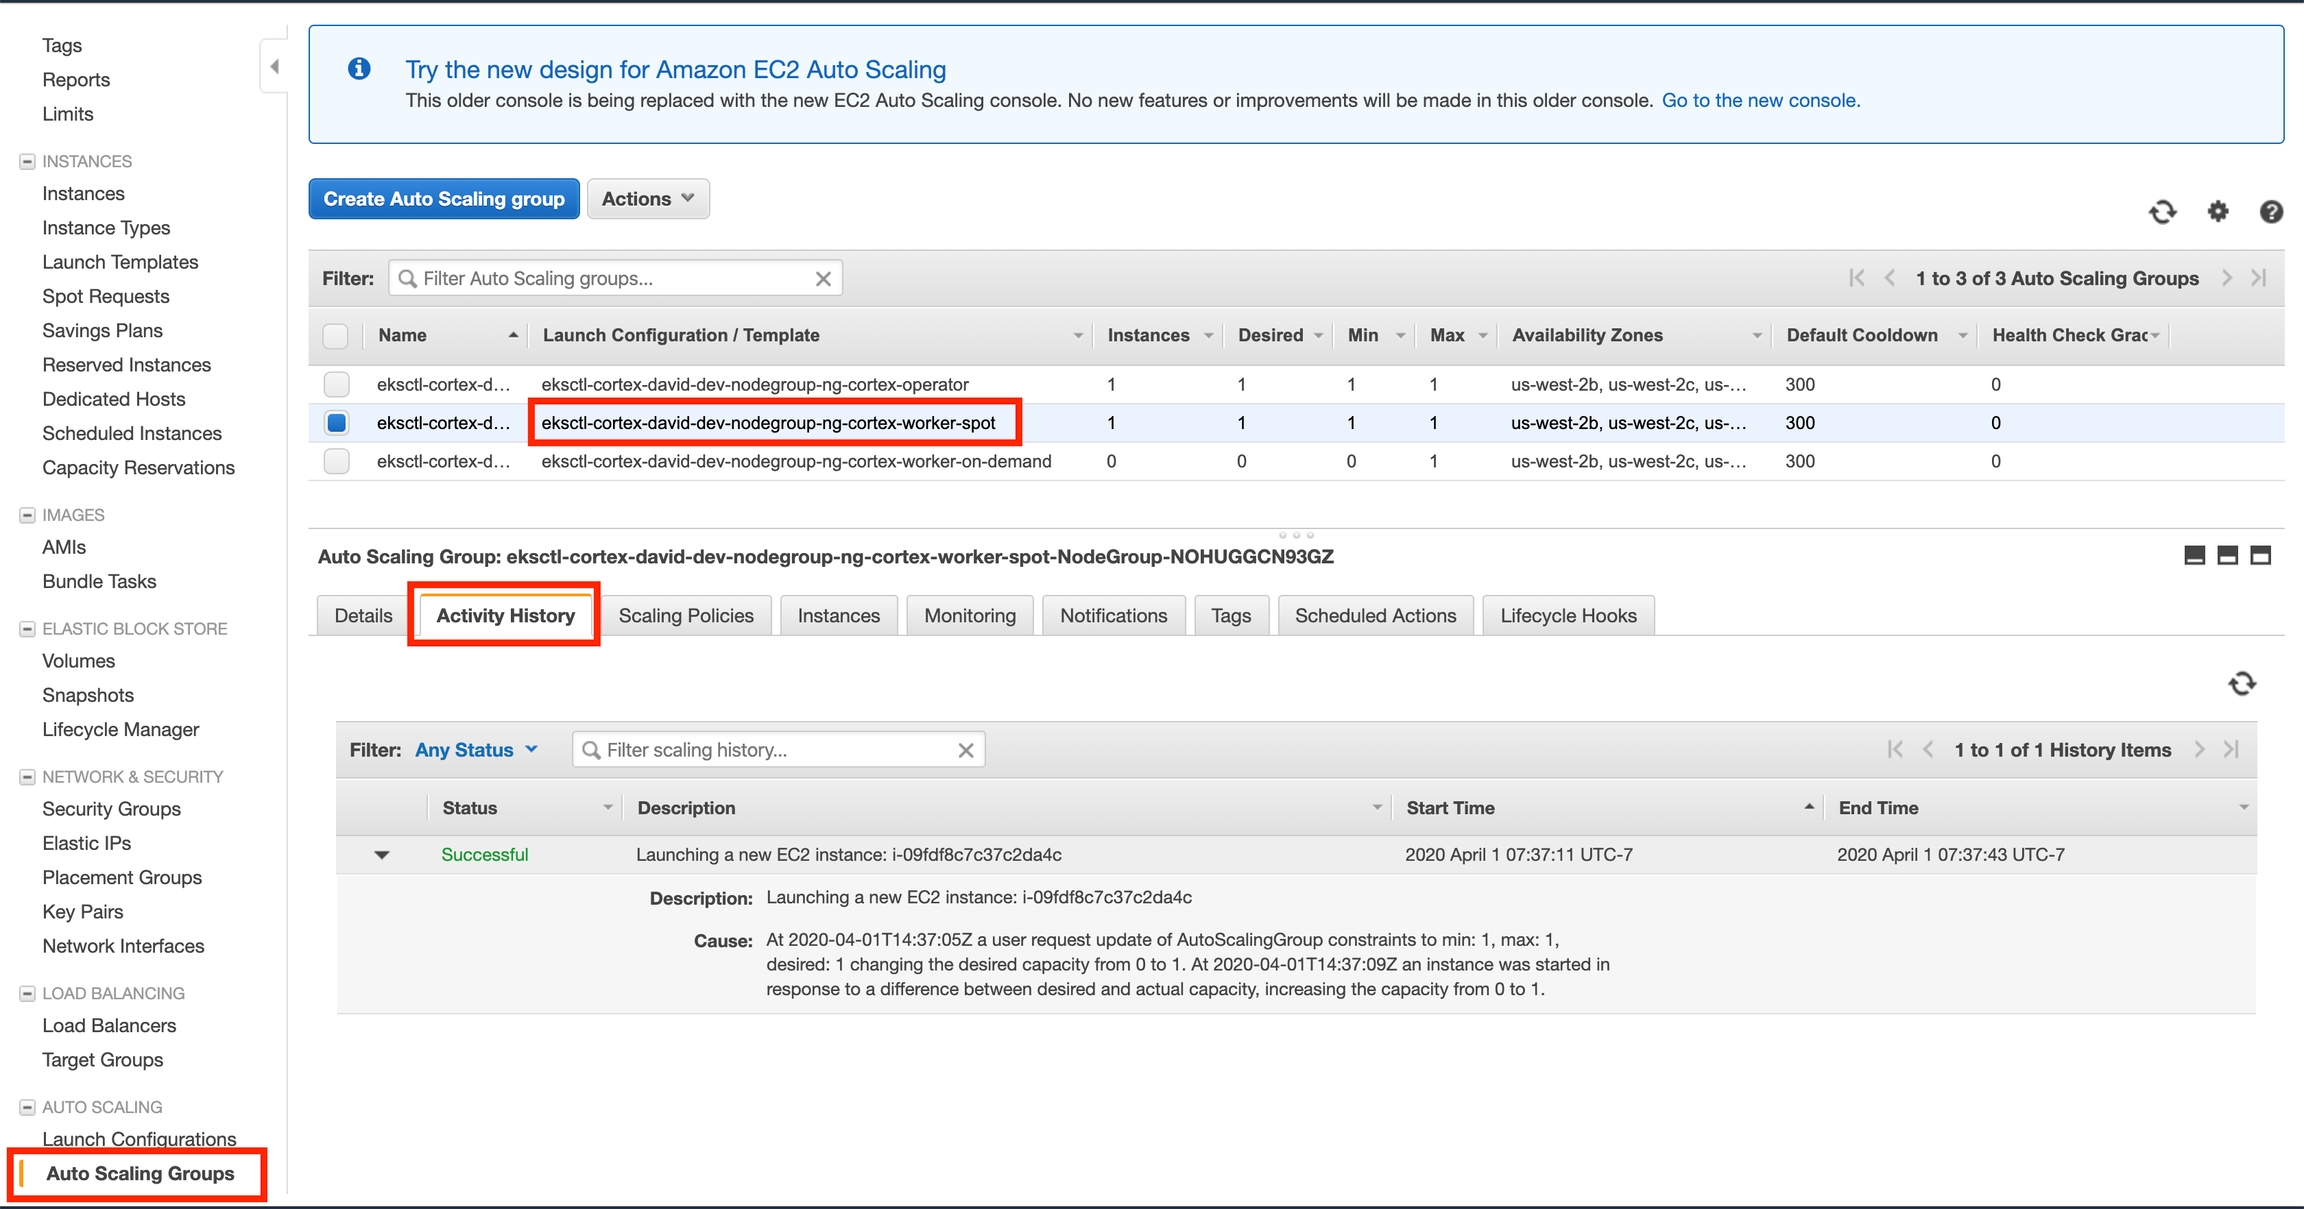
Click the "Activity" tab at the bottom half of the screen (it may also be called "Activity History" depending on which AWS console UI you're using)
Scroll down (if necessary) and inspect the activity history, looking for any errors and their causes
Repeat steps 3-5 for the other worker autoscaling group (if applicable)
Here is how it looks on the new console UI:
On the old UI:
The most common reason AWS is unable to provision instances is that you have reached your instance limit. There is an instance limit associated with your AWS account for each instance family in each region, for on-demand and for spot instances. You can check your current limit and request an increase here (set the region in the upper right corner to your desired region, type "on-demand" or "spot" in the search bar, and click on the quota that matches your instance type). Note that the quota values indicate the number of vCPUs available, not the number of instances; different instances have a different numbers of vCPUs, which can be seen here.
If you are using spot instances and don't have on_demand_backup set to true, it is also possible that AWS has run out of spot instances for your requested instance type and region. You can enable on_demand_backup to allow Cortex to fall back to on-demand instances when spot instances are unavailable, or you can try adding additional alternative instance types in instance_distribution.
Disabling rolling updates
By default, cortex performs rolling updates on all APIs. This is to ensure that traffic can continue to be served during updates, and that there is no downtime if there's an error in the new version. However, this can lead to APIs getting stuck in the "updating" state when the cluster is unable to increase its instance count (e.g. for one of the reasons above).
Here is an example: You set max_instances to 1, or your AWS account limits you to a single g4dn.xlarge instance (i.e. your G instance vCPU limit is 4). You have an API running which requested 1 GPU. When you update your API via cortex deploy, Cortex attempts to deploy the updated version, and will only take down the old version once the new one is running. In this case, since there is no GPU available on the single running instance (it's taken by the old version of your API), the new version of your API requests a new instance to run on. Normally this will be ok (it might just take a few minutes since a new instance has to spin up): the new instance will become live, the new API replica will run on it, once it starts up successfully the old replica will be terminated, and eventually the old instance will spin down. In this case, however, the new version gets stuck because the second instance cannot be created, and the first instance cannot be freed up until the new version is running.
If you're running in a development environment, this rolling update behavior can be undesirable.
You can disable rolling updates for your API in your API configuration (e.g. in cortex.yaml): set max_surge to 0 (in the update_strategy configuration). E.g.:
TensorFlow session
When doing inferences with TensorFlow using the Realtime API Python Predictor or Batch API Python Predictor, it should be noted that your Python Predictor's __init__() constructor is only called on one thread, whereas its predict() method can run on any of the available threads (which is configured via the threads_per_process field in the API's predictor configuration). If threads_per_process is set to 1 (the default value), then there is no concern, since __init__() and predict() will run on the same thread. However, if threads_per_process is greater than 1, then only one of the inference threads will have executed the __init__() function. This can cause issues with TensorFlow because the default graph is a property of the current thread, so if __init__() initializes the TensorFlow graph, only the thread that executed __init__() will have the default graph set.
The error you may see if the default graph is not set (as a consequence of __init__() and predict() running in separate threads) is:
To avoid this error, you can set the default graph before running the prediction in the predict() method:
Last updated